Happy Monday Ladies!
I mentioned on Saturday I would be working on a couple of projects over the weekend. I have one to share with you today.
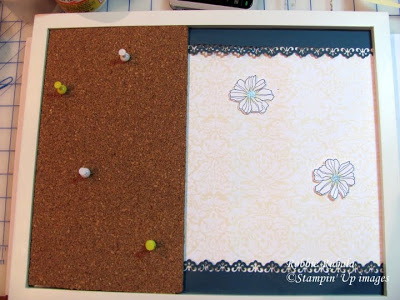
It is my week to design a project for the Late Night Stampers group. Our challenge this week is to do a home decor item. I have to admit I have not done any home decor items as I just never had any ideas to use. Over the past few months there have been a lot of people creating magnetic memo boards from roof flashing. I thought it would be a good idea to personalize mine by adding some cork on half of it. I could not buy just 1 piece of flashing as it comes in rolls and then the edges would need to be rounded which requires a heavy duty rounder which I didn’t have.
In talking to my friend Candice she mentioned putting it in a frame. As it worked out her husband had some roof flashing he doesn’t use very often and gave me a piece so I just needed to get my frame. There was also a 3D thirty minute challenge from Carole’Anne and Sandi’s blog that I decided to play along with, and I made it in the 30 minutes! Yeah!!!!!!
When the idea came to me I knew I wanted to make this for my daughter so the theme and colors were already determined. She loves pale yellow and fleur de lis so that is what I went with. As I was doing this I took pictures so I have a tutorial for you also. I will tell you that to attach your designer series paper to the flashing you need to use either sticky strip (highly recommend this as it was easier) or Tombow mono adhesive. Mod Podge does not work (ask me how I know this 🙁 ). Okay so I know you are dying to see my project so here is is.
Okay so here are the directions for making one for yourself.
Attach the designer series paper to your flashing using sticky
strip. The size of ds paper you use is basically a personal preference. You can make each side the size you want.
Turn your flashing over and fold the edges back and attach with sticky strip. This gives you a nice finished edge.
Since my frame was bigger than my flashing I decided to add a punched strip at the top and bottom to hide the extra space. I punched out my strips and attached to my frame with sticky strip (it is easier to attach it to the frame and then you don’t have to precise in placing your flashing).
Your next step is to add some sticky strip to the back of your punched strip so when you put your flashing in you can stick them together. I put mine close to the punched edge so I could use my piercing tool to pull off the backing when I had my flashing placed.
Now you need to put your flashing in your frame, add your glass behind, and all the layers that came with the frame. Last, put your backing on and make sure everything is straight and snug, then close the backing.
Use your piercing tool to remove the backing from the sticky strip and press the punched strip onto the top and bottom of your covered flashing.
Determine the size of corkboard you will need. I made mine wide enough to cover the edge of my designer series paper on the other side. Then using a ruler mark the cork in several places. Use your ruler and your marked places to create a straight lin e and using your exacto knife cut through the layers using several passes.
Make sure you cut all the way through the cork and not pull the extra away or the cork will rip and leave an edge that is not clean.
Repeat for the height you will need.
Attach your cork using sticky strip.
Stamp your magnetic elements (mine are the flowers). Using mod podge coat several times to make them stiff. Add your magnet to the back and you are done.
Stampin’ Up Supplies
Stamps: Fifth Avenue Floral Paper: Not Quite Navy, white, Bella Bleu DS Ink: Not Quite Navy, Barely Banana (used on flower centers feathered out) Accessories: sticky tape
Hope you enjoyed today’s project and tutorial. Please let me know what you think by leaving me a comment. Don’t forget to check back later this week to see my other project. Thanks for looking and have a Marvelous Monday!
Robbie


