Stampin’ Up Meadow dies Hi
Hello Everyone – I have a pretty card that uses the Stampin’ Up Meadow dies Hi cut in black. Wait until you see it.
I love using black and another color. I saw a card online that used a layout similar to this one so I decided to put my spin on it using Black and Flirty Flamingo.
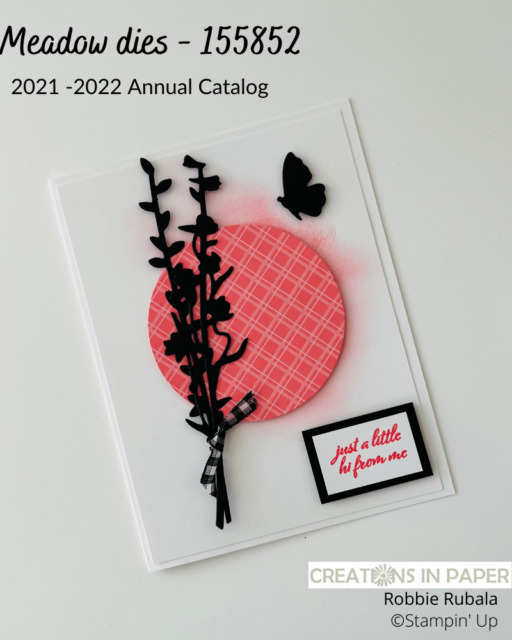
The Meadows dies have great images you can use to add to your cards as fillers. They are also great for focal images like I used them on my card.
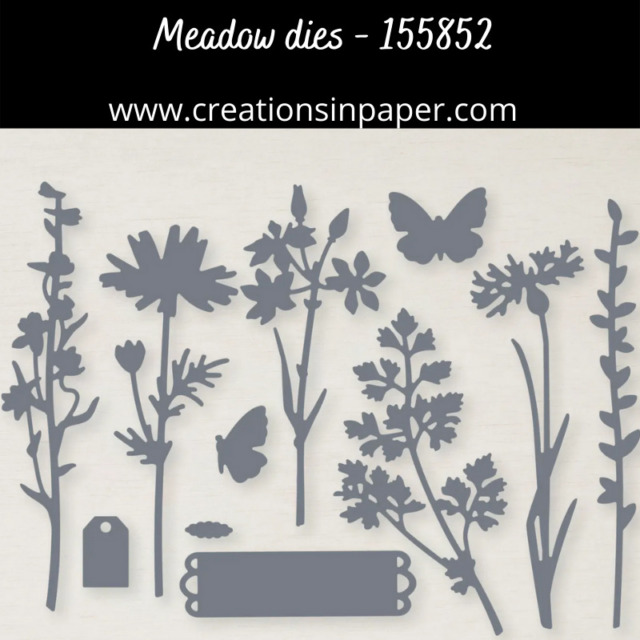
I have used these dies for several other cards. Here is one where I sponged on ink to color the flower. This card uses the dies and they were colored using Fall colors.
A stencil was created using the die and I used the stencil to color it on the inside of the card and the envelope.

Ready to make this card? Here are the details.
Measurements for the Stampin’ Up Meadow Dies Hi card
Card Base: White 5 1/2″ x 8 1/2″ and 4″ x 5 1/4″ and scrap for stamping the sentiment
Basic Black: scraps for die cutting
Brights pattern paper pack: scrap for die cutting – I used the Flirty Flamingo plaid pattern
Step by Step
- fold and burnish the card base
- using the Layering Circles dies and the scrap of Brights pattern paper pack cut out a circle that is about 2 3/4″ wide
- using the circle cut above as a guide, use blending brushes and Flirty Flamingo ink to sponge on ink on the 4″ x 5 1/4″ piece of White so it shows on the upper outside of the circle – see photo above
- add the White panel to the card base
- attach the circle of pattern paper to the card base using dimensionals
- die cut the skinny stems in the dies from Black
- add dots of glue to the back of the stems and glue it on the pattern paper circle – Note: only add the glue to the middle section of the stems – see photo above
- tie a strip of the Black & White gingham ribbon around the bottom of the stems
- die cut the butterfly from Black and add it to the card front using a dimensional
- stamp the sentiment onto a scrap of White using Flirty Flamingo ink then trim to size
- cut a piece of Black a little larger than the white sentiment rectangle then glue the 2 rectangles together
- add the sentiment to the lower right hand corner of the card front using dimensionals
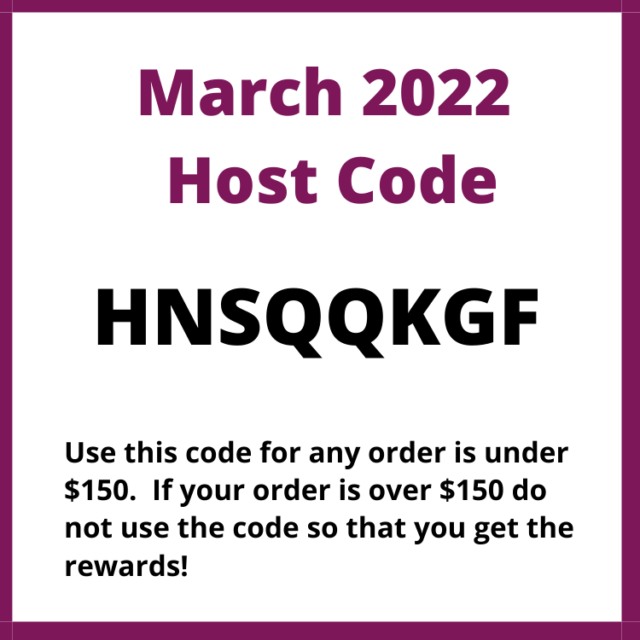
March Host Code – HNSQQKGF
Use this host code when your order is under $150 and receive a free gift from me! If your order is over $150, please do not use this code, but you’ll still get the free gift.
***Make sure that you can see my name on the final checkout page listed as your Demonstrator when you order so that you know that you’re ordering with me and you’ll get my rewards!
Products used to create the Stampin’ Up Meadows Die Hi card
Product List")


 Designer Series Paper")
 Gingham Ribbon")


Thanks for visiting me today and I hope my Stampin’ Up Meadows Die Hi card will inspire you to look at your dies in a different way.
Have a Sensational Sunday!
Save 20% on the mini Cut & Emboss Machine and select stamp sets

Waves of the Ocean