Stampin’ Up On the Horizon bundle
Hello Everyone – have you ordered the Stampin’ Up On the Horizon bundle yet?
I am an admin in a World Card Making Group on Facebook and this month our challenge is to make a masculine card. I knew I could use the New Horizons suite of products for my card that I have to post today. That means you get an extra idea for me today.
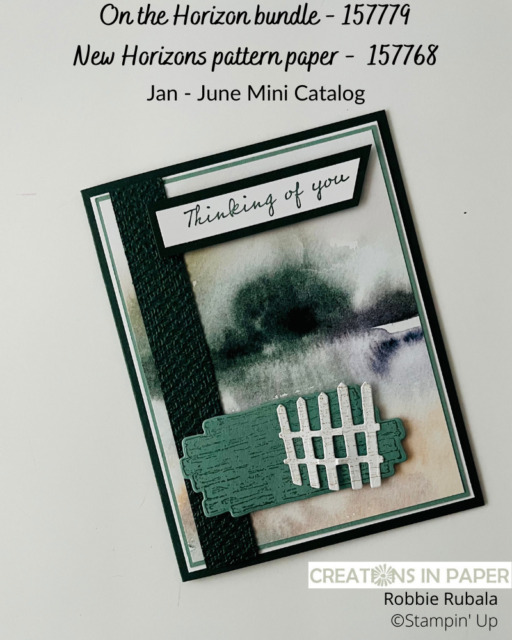
I love the New Horizons pattern paper as it makes designing your card so easy. I found a great pattern to use and this is what I designed.

This suite was not one that caught my eye when I first looked at the catalog. Then during OnStage in November it was a feature of one of the presenters and I was hooked! This suite has some gorgeous pattern paper.

When I went to design my card I was really stumped. I decided to check out my challenge blogs to see what I could find. I found a great sketch challenge to use at Paper Craft Crew Challenges.

I took some liberty with the sketch square and circle elements. Check out how I addressed these elements.

I thought the grass stamp would be perfect for using on the inside of the card and envelope. I love these scribble grasses as an image on your card. They are perfect for the theme of this suite.

Would you like some more ideas for masculine cards? Here is an idea for someone in your life who might be a sailor. If you have a nature lover, check out this idea.
Measurements
Card Base: Mossy Meadow 5 1/2″ x 8 1/2″ scored and folded in the middle
New Horizons pattern paper: 4″ x 5 1/4″ any pattern will work with this layout
Evening Evergreen: 3 3/4″ x 5 ” – 3/4″x 5 1/4″ – strip for sentiment
Soft Succulent: 3 7/8″ x 5 1/8″ – scrap for stamping and die cutting
White: 4″ x 5 1/4″ – scraps for stamping and die cutting – strip for sentiment
Here is how you can make the Stampin’ Up On the Horizon bundle card
- fold and burnish the card base
- glue the New Horizons pattern paper to the Soft Succulent panel
- attach the panel from above to the White panel
- add the panel from above to the card base
- emboss the 3/4″ x 5 1/4″ strip of Evening Evergreen using the Tasteful Textile embossing folder
- with Tear & Tape, add the embossed strip to the card front about 1/4″ from the left edge of the pattern paper
- stamp the wood stamp onto Soft Succulent card stock using Soft Succulent ink
- cut out the stamped image using the coordinating die
- cut out the fence from White using the die
- stamp the wood stamp onto the fence using a second generation stamping with Crumb Cake
- add the wood die cut to the card base using dimensionals – see photo above
- use liquid glue to add to the picket at each end of the fence – attach the right end of the fence to the wood die cut – bow the fence and glue the left end of the fence to the wood die (you need to leave a little bit of the bow in the fence)
- once the end pickets of the fence are stuck down well, push down of the bow to give the fence a weathered look – see photo above
- stamp the sentiment using Evening Evergreen ink onto the White strip
- angle cut the right side of the sentiment
- adhere the white strip to the Evening Evergreen strip
- mimic the angle cut of the White strip on the Evening Evergreen strip
January Host Code: BWBA27TE
Use this host code when your order is under $150 and receive a free gift from me! If your order is over $150, please do not use this code, but you’ll still get the free gift.
***Make sure that you can see my name on the final checkout page listed as your Demonstrator when you order so that you know that you’re ordering with me and you’ll get my rewards!
Here are the products I used to make my Stampin’ Up On the Horizon bundle card
Product ListI hope you are ready for a great weekend! I am hoping that the ice storm did not knock out my electricity so I can work on my classes.
I hope my Stampin’ Up On the Horizon bundle inspired you to look for other papers in this collection to design with. Have a Fabulous Friday!


