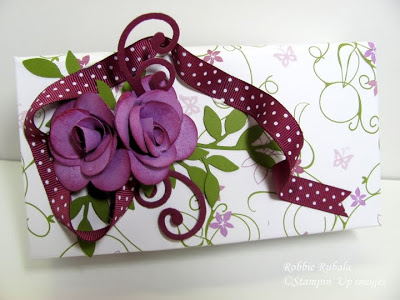
I am so glad you stuck with me as I tried to get this up. This week is finally settling down and it should be a little bit more quieter so that I can get back on track. I know you came for the directions, so here they are. The white dots in the pictures are the reflection in my cook top from my recessed lighting. I had to photograph the patterns on the black so they would show up. I also used scrap paper and taped it together to get the size I needed (I often do this to design my pattern rather than ruin a piece of cardstock).
Note – since the size to make the pattern needed to be 14″ to have one piece to cover everything, I used a second piece to cover each small end of the box since the paper is only 12″ long.
I began by using the box to create a template.
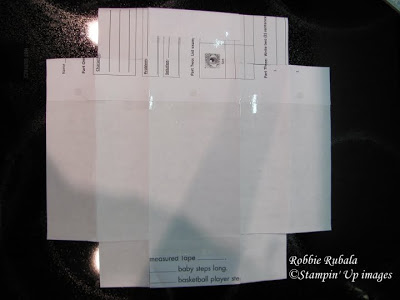
Note: All measurements are based on the box I used (3 3/8″ wide by 6 3/8″ long by 1 7/8″ high). You may need to adjust your measurements if your box is a different size.
Since the template needs to be 14″ on one side, I pieced the ends of the short sides ~ you will not need a piece as long if the bottom of your box is white, mine had my name and address on it so I decided to cover the bottom also.
The template measures 10 1/4″ x 11″. Having the 10 1/4″ side at the top, score it at 1 13/16″ on each side. Flip the paper and have the 11″ side at the top and score at 1 3/4″, 3 11/16″, 7 1/8″, and 9 1/16″. Fold on all scored lines. With the 10 1/4″ side at the top, cut on all scored lines down to the 3 11/16″ line – you will be making 4 cuts, two on each side (if you look at your scored pattern you can see the bottom of your box in the center, you are basically cutting down to these lines).
Now turn your paper so that the 11″ side is at the top. Cut on the first scored line (1 3/4″ and 9 1/16″) down to the first horizontal scored line – you are basically cutting off the corners (see picture).
You will also need a smaller piece of your patterned paper to cover the inside of the short ends (see picture below). Cut a piece of patterned paper 2 1/2″ x 7 1/2″. Score at 2″ and 5″. You will need to cut on these score lines. To determine how far down to score, wrap the paper around the inside of the box and cut down to the top of the box (it is about 1/2″). Repeat this part for the piece for the other end.
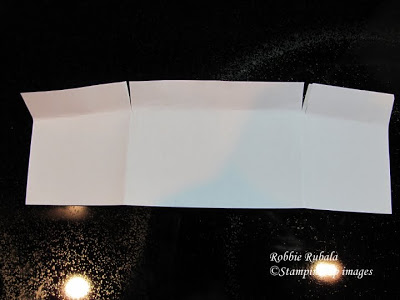
You are now ready to cover the box (I used the Cottage Wall DS paper – love this stuff and will miss it when it retires). Using the small piece of paper attach sticky strip at the edge of the small cut flaps and down each side. Wrap the piece of patterned paper around the inside of the box – make sure the side you want to show is facing out. Pull the sticky strip off of one side and attach it to the box. Wrap the small flaps over the sides of the box and attach with the sticky strip. Repeat for other side. You now have your ends covered.
To cover the rest of the box, attach sticky strip to the outside edge of each side (this will be the 2 long sides and the inside flap – the piece between the 2 scored lines – of the short side). Set the box on the wrong side of the patterned paper (the side you want to show should be down on your table). Fold up the short end and attach to the top of the box with the sticky strip. Now attach each of the flaps. Repeat for the other side. Working with the long side, fold the paper up and over the side of the box and attach with the sticky strip – you are actually wrapping the paper all the way to the bottom of the box. Repeat for other side. Use your box to cut a piece of white cardstock the size of your bottom – mine was 6 3/8″ x 3 3/8″. Push this piece in the bottom of your box – adjust the size if it is too tight to push in (you do want it somewhat snug as it will hold the end of your patterned paper down). Your bottom is now covered!
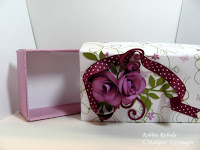
Repeat this procedure covering the top of the box. Now you are ready to decorate the top of your box. Note: You need to use the Tombow multi purpose adhesive (found on page 192) to glue all of the following. I have admired all the paper roses I have seen on cards and projects and decided it was time to try my hand at it. I commented on a card I saw and the lady sent me the directions for them. If you want to try your hand at it, here is the link for them. While my glue was drying I used the Little Leaves sizzlit die to cut out Old Olive leaves and the Swirls and Scribbles sizzlit die to cut out Rich Razzleberry swirls (you can find them on page 196 of the catalog). I then pulled out my Rich Razzleberry polka dot ribbon and began decorating. You can decorate your box any way you like. You can even add more roses if you enjoy making them.
After your box is done, you are now ready to create your note cards. The 3 x 3 envelopes (found on page 168) fit perfectly in this box so I used those and just cut my colored cardstock 3 x 6 and folded in half. I used some of the paper from Cottage Wall to add layers and elements and the sentiments from Matchbox Messages, All Holidays, and One of a Kind. I combined them with various punches to get my finished elements.
Stampin’ Up Supplies
Stamps: Matchbox Messages, Flight of the Butterfly, One of a Kind, All Holidays Paper: Old Olive, Orchid Opulence, Rich Razzleberry, white, Cottage Wall DS paper Ink: Old Olive, Orchid Opulence, Rich Razzleberry Accessories: punches – 1″ – 1 3/8″ – 1 3/4″ – scallop circles ~ large flower ~ scallop trim corner ~ corner rounder ~ trio flowers ~ rounded tab ~ designer label ~ photo corner, Old Olive ~ Orchid Opulence ~ Rich Razzleberry markers, Little Leaves ~ Swirls & Scribbles sizzlits, Rich Razzleberry polka dot ribbon, gold brads, Tombow Mulit Purpose adhesive, sticky tape, dimensionals
I hope this is not confusing for you. If it is, send me a message and I can take more pictures to make it a little clearer for you. I am off to work on my card for tomorrow. Thanks for looking and have great afternoon!
Robbie

