Happy Friday Everyone!
Wow I can’t believe how fast the week flew by. It just seems like yesterday was Monday.
Today’s project is for the Back to School challenge at Late Night Stampers. If you are not a member of this group you are missing some awesome cards and projects. Since this is not a card it also fits the Anything but a Card challenge at Hand Stamped Sentiments. It also goes for the Back to School challenge at Ann’s Creative Corner. Sticky tape was used for all of the projects.
At the beginning of the week I made a post-it note holder for a teacher. I thought it would be fun to add to that and create a desk set. The first thing I did was take a mini legal pad and cover the top with paper (I did not have the Neutrals pack of paper so I had to use some retired patterned paper as I wanted black and white dotted on my projects). I then punched out 3 circles and cut them in the shape of an apple. I cut brown to form a stem and then green to form the leaves. I made 3 of them to put at the top.
Next I wanted a container for paper clips and binder clips. I remember I had a bunch of containers that I had saved when I purchased a bunch of paper flowers from the $1 spot in Target. I pulled it out and thought it would be a good base but the colors were wrong. I pulled out my black with white polka dot paper and cut it to go around the outside. I had it all covered and then needed to add a red ring to the plastic top. I did this and when I put the top on I realized the top went inside the container and not outside. This would not have been a problem except my paper I covered the outside with was cut the same height as the side so when you put the top on, you could see the old pattern on the top ring around the container. Grrrrrr, so I decided to try my hand at making my own container.
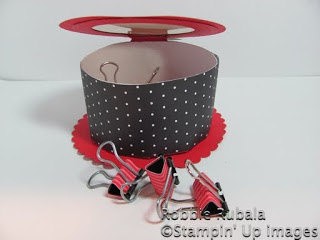
Now the fun really begins. I cut a large scallop circle out of red. I then made a ring out of white cardstock. And then it hit me, how was I going to attach it to the scallop circle base. I decided to cut a circle larger than the ring and then cut the edge to allow me to attach the circle by folding the edge up (similar to cutting the seam allowance when you sew to allow the seam to give). After I had the edge attached, I cut the black and white strip to go around the outside and attached with sticky tape. My circle box was now complete. To attach it to the scallop circle I again used sticky tape. My container was now complete and just needed a lid.
I cut another scallop circle and I wanted it to be see through so I cut a smaller circle out of the center. and attached a piece of acetate. I then cut another circle smaller than the scallop circle to hide the sticky tape and cut a circle out of the center. As I was getting ready to join the 2 circles, it hit me. This would be so cute if the top was actually an apple. That meant I went back to the drawing board.
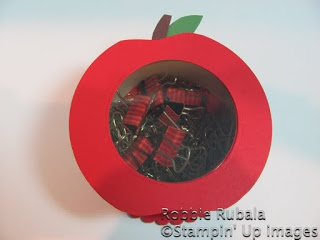
So I took and cut a large red circle and carefully shaped it like an apple. Then I cut the brown like a stem and a green leaf. I cut the center out again and attached the acetate. As it worked out the circle I made when I was using the scallop circle top worked so I used it and attached to the back of the apple to hide the acetate and the stem and leaf.
Now I needed to have a way to attach the top to the container and be able to open it. I remember reading on Carole’ Anne’s blog Stampin Stress Away that she had used the round tab punch to make a hinge for her box so I decided to do the same thing. It was then I realized I had taped my container together. I very carefully pulled the box apart and stuck the tab down inside. I added some more sticky tape and my hinge was now part of my container. I had to attach it to my apple lid and I was done. I did have to cut the tab down on the lid so it wouldn’t show through the acetate.
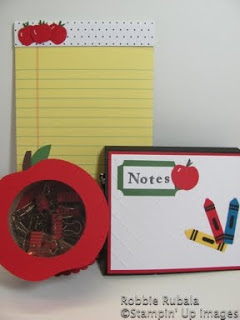
Now if you have read the really long post above I know you are anxious to see what I did. Here is the legal pad and apple container.
view of apple container from top
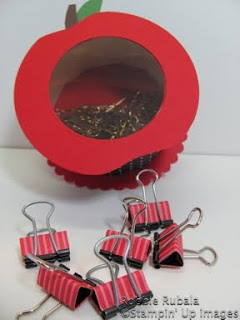
some of the binder clips I covered with red paper from patterned paper stack
the side view with lid opened
The complete desk set including my post- it not holder from earlier this week.
I hope you have enjoyed my project today. Thanks for sticking with me and reading my long post about my issues while I was making the apple container. Have a Fabulous Friday!
Robbie


OMG-DYING here! This is just so darn cute. I would have LOVED to have received something like this when I was teaching. As always Robbie, great job! Thank you for sharing and joining us at Hand Stamped Sentiments this week.
Fabulous teacher gift Robbie, thanks for sharing.. when I first looked at the apple in your email, I thought you had used a cupcake liner for the cup.. glad I took a moment to check out the whole post!
Another fab project. So creative! I love the apple theme. Thanks for playing at Hand Stamped Sentiments.
Robbie this is fantabulous!!!! What an original idea with the apple clip holder!! Thanks for playing along at the Nook this week!
Man you seem to set the bar higher and higher each time, thanks so much Robbie for playing with us at HSS. Your project is not only adorable but totally practical!!! You can't beat that with a stick.