Stampin’ Up Hello Ladybug with Misty Moonlight
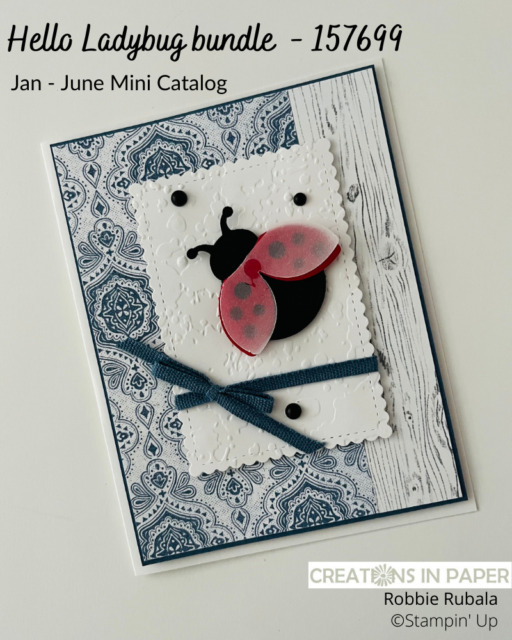
Happy Monday Everyone – today’s quick and easy Stampin’ Up Hello Ladybug with Misty Moonlight card is super cute and would brighten anyone’s day.

We have our Ladybug Stamp Camp this Friday and I had so much fun playing with this bundle. This is a great bundle to play with.

Purchase this bundle to save 10%.
Check out that panel behind the ladybug. I used the new Stripes & Splatters embossing folder to add some texture.

In case you missed some other ideas using this bundle, check out this cute idea with the ladybug and a yellow flower. And don’t miss how I used the punch to make this flower and butterfly for another way to extend the use of the punch.
Here are all the details for today’s card so you can make it.
Measurements
Card Base: White 5 1/2″ x 8 1/2″ scored at 4 1/4″
Misty Moonlight: 4″ x 5 1/4″
Basic Black: scrap for punching
Real Red: scrap for punching
White: 3 7/8″ x 5 1/8″ and 2 3/4″ x 4″
Vellum: scrap for punching
Heart & Home pattern paper: 3 7/8″ x 5 1//8″ blue and white pattern
Let’s make it!
- fold and burnish your card base
- take the pattern paper and cut 1″ off the right hand side
- add the blue pattern paper to the left side of larger white panel matching the side and top and bottom – no white should show on the left side and top and bottom
- flip the 1″ strip you cut off and flip it over so the wood grain pattern is showing, add the strip to the right side of the white panel butting it up against the blue pattern paper – none of the white panel should be showing
- add the pattern paper panel you created above to the Misty Moonlight panel
- use dimensionals to add the Misty Moonlight panel to the card base
- take the other white panel and die cut it with the Stitched So Sweetly die that fits on it
- use the Spatters embossing folder to emboss the die cut
- Tie a bow around the lower portion of the embossed die cut using Misty Moonlight 1/8″ cotton ribbon – see photo above
- add the embossed panel to the center of the card front using dimensionals
- use the punch and black card stock to punch out the ladybug body
- stamp the dots for the wing on a scrap of Real Red
- punch out the wings by centering them in the punch
- add the wings to the ladybug using a mini dimensional
- to punch the wings using the vellum, hold the vellum along with a piece of white and punch the wings – the wings will crunch if you do not have the stability of the white
- add the vellum wings to the red wings using a glue dot at the top
- use dimensionals to add the ladybug to the embossed panel above the ribbon – see photo above
- sprinkle on the black matte dots
February Host Code: R4RQEF7T
Use this host code when your order is under $150 and receive a free gift from me! If your order is over $150, please do not use this code, but you’ll still get the free gift.
***Make sure that you can see my name on the final checkout page listed as your Demonstrator when you order so that you know that you’re ordering with me and you’ll get my rewards!
Shopping cart for Stampin’ Up Hello Ladybug with Misty Moonlight
Product ListI can’t wait for Friday evening and our Ladybug Stamp Camp. We have some great cards we will be making.
Thanks for stopping by and I hope I inspired you with the Stampin’ Up Hello Ladybug with Misty Moonlight card.
Have a Marvelous Monday!


