Stampin’ Up Pretty Prints Fancy Fold
Hello Everyone – an interesting card today with the Stampin’ Up Pretty Prints Fancy Fold idea.
Last week I had my Pretty Prints class. For my Advanced class I always do a fancy fold. I try different ones and then choose the one for the class. I was playing with an idea where instead of making a pocket, you leave the card open and the half flap folds down. It made for an interesting fancy fold.

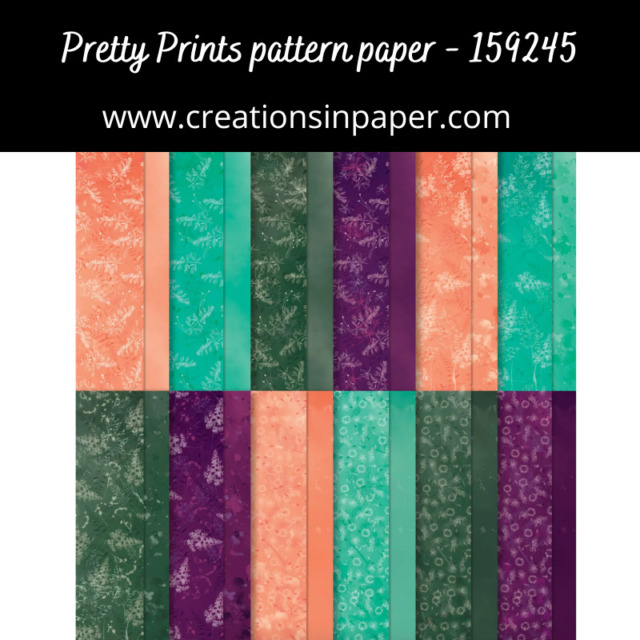
I love pairing new products with ones that are not part of that suite. For today’s idea I used the Pretty Prints pattern paper with the Eden dies for the decorative edge.
I love the detail of the edge die in the die set and knew it would be the perfect idea for the card. It adds just the touch of color the card needs to break up all the white space.

Since this is a fancy fold down card I used some of the beautiful paper and the feather stamps – love that stamp – in the coordinating Eden’s Garden stamp set to add a decorative top to the card. I used the same stamp to do the envelope.

Fancy folds are one of my favorite kind of cards to make. I like doing the simple ones as well as the more elaborate ones. This idea uses pattern paper for a quick and easy idea. This is basically the same card but instead of folding down it folds out.
Curious how I made this card? Here are all the details
Measurements for Stampin’ Up Pretty Prints Fancy Fold
Card Base: Basic White 4 1/4″ x 8 1/2″ scored at 5 1/2″
Bermuda Bay: 1″ x 4 1/4″
Pretty Prints pattern paper: 1/2″ x 4″ – speckled pattern and 2 3/4″ x 4″ – 2 ferns pattern
Step-by-step – note this card has the fold at the bottom and the top flap folds down
- affix stamp to block
- fold and burnish card base
- use the edge die and the strip of Bermuda Bay to die cut the edge of the strip
- using the retired Detailed Trio punch to round the top corners of the card base and the 2 pieces of Pretty Prints pattern paper – see photo above
- glue the die cut strip to the top of the fold down flap on the card base using Tear & Tape – see photo above
- add the large piece of Pretty Prints pattern paper to the fold down flap – see photo above
- glue the small strip of Pretty Prints pattern paper to the top of the card base – see photo above
- using the feathery sprig stamp and Bermuda Bay ink, mask off the pattern paper and stamp the sprig across the top of the card – see photo above
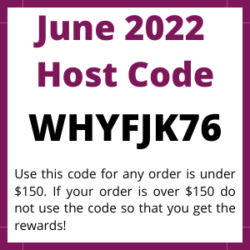
June Host Code – WHYFJK76
Use this host code when your order is under $150 and receive a free gift from me! If your order is over $150, please do not use this code, but you’ll still get the free gift.
***Make sure that you can see my name on the final checkout page listed as your Demonstrator when you order so that you know that you’re ordering with me and you’ll get my rewards!
Product list for Stampin’ Up Pretty Prints Fancy Fold card
Product List")


 Designer Series Paper")


I hope my Stampin’ Up Pretty Prints fancy fold inspired you today. It is a fun and super easy fold.
Have a Sensational Sunday!
June Host Code
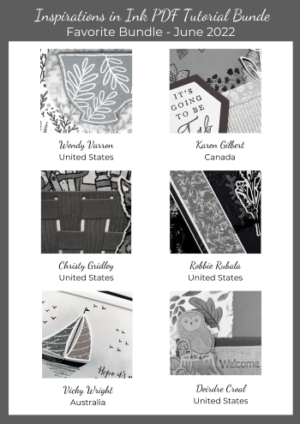
June Inspirations in Ink Tutorial Bundle – get it free with a $35 order using the host code above
Want more great ideas? Sign up now